Thursday, April 28, 2011

Royal Wedding of William & Kate Viewing {Breakfast in Bed}

Eeek!  I am seriously so excited for the Royal Wedding!  It is less then 24 hours away.  In the same time I, as a girl who has had her wedding day, the nerves & the excitement of being a bride.  Can honestly say is beyond exited for Kate Middleton & her family.  I know there are so many horrible things going on in our world at this moment that we could be focusing on & that I pray for, but as I type that I also feel it is nice to appreciate the world we live in and enjoy the good things.  
Kate Middleton is middle class commoner girl who is marrying her prince and he really is a prince LOL who will one day be King!  Could you imagine!  What an amazing fairytale!  What I believe is, yes pray and do what you can for those in need.  At the same time enjoy happy things in life that go on around you, at the moment it is the Royal Wedding!


With that being said, I have a daughter as I mentioned who is 11.  Our alarms are set for 5am, and we are going to watch it together and create a memorable moment!  I know she will remember this fairy tale wedding as I remember the Royal Wedding from my childhood.


What's a commoner Mom (me) to do to create such a thing for her 11 yr old who is actually trying to trace her ancestry for any Royal blood possible in her line.....LOL? (Yes she is trying to find something via www.ancestry.com!) A girl can dream right?  Here is what is planned~


Our tea trays are set & while I can not have a street party and believe me I would if I could!  I have created a mini-one in my home to make it fun for us while we watch the event with breakfast in bed!  I created banners and hung them from the my chandelier, grabbed yellow pom flowers, whipped up some fresh lemon curd and we are ready!  


First step dowload click her for your free printables from Hostess with the Mostess  also see all the beautiful inspiration Jenn styled with her designs!


Union Jack printables ~ download free printable for that here


 I used the napkin rings from HWTM~ cut & taped to create chain link banners


Everyone needs a Coat of Arms to marry into the Royal Family ~ we created our's here!  Very fun!  You have to check it out the site! 

Here is the Brennan Family Coat of Arms

  We have fresh oj & tea of course! 


We will enjoy an easy breakfast!  I don't want to spend anytime away from the live coverage.  So this commoner Mom will serve a scrumptious and appropriate breakfast treats!  


 Fresh strawberries, pound cake pieces, fresh lemon curd and whipped cream.  
Lemon curd recipe below.  


Using our tea cups for cereal 
(my daughter is headed to school at 8 am so we need to balance our sweets;)) 
Use your creamer for you milk


Raspberry Danish & English muffins


I hope you are inspired to take some time to enjoy the Royal Wedding with your daughter or daughters!  As they say A child's life is not a race it's a journey! 
 Enjoy, relax, create a memory!  She will appreciate it someday!  How often to you get to witness a girl becoming a true princess!!!   

Here is your recipe & how-to for the Lemon Curd.  It is scrumptious, I promise you and easy to make.  Visit www.joyofbaking.com to watch the video on how to make it!  Recipe c/o Joy of Baking

Lemon Curd Recipe:

3 largeeggs
3/4 cup (150 grams) granulated whitesugar
1/3 cup (80 ml) freshlemonjuice(2-3 lemons) (do not use the bottled lemon juice)
4 tablespoons (56 grams) unsaltedbutter, at room temperature
1 tablespoon (4 grams) finely shreddedlemon zest


Note:  Room temperature lemons provide more juice. After squeezing, strain the juice to remove any pulp. Zest is the yellow, sweet-flavored outer rind of the lemon. A zester or finegratercan be used to remove the rind. Cold lemons are much easier to grate. Grate lemons just before using as the zest will lose moisture if it sits too long.

Lemon Curd:In a stainless steel bowl placed over a saucepan of simmering water, whisk together the eggs, sugar, and lemon juice until blended. Cook, stirring constantly (to prevent it from curdling), until the mixture becomes thick (like sour cream or a hollandaisesauce) (160 degrees F or 71 degrees C). This will take approximately10 minutes. Remove from heat and immediately pour through a fine strainer to remove any lumps. Cut the butter into small pieces and whisk into the mixture until the butter has melted. Add the lemon zest and let cool. The lemon curd will continue to thicken as it cools. Cover immediately (so a skin doesn't form) and refrigerate for up to a week
.
Peace, Love & 
The Royal Wedding of William & Kate,


Stacy


Wednesday, April 27, 2011

Royal Wedding Favors Idea

Hi!  I know many of you including myself are thrilled that the biggest Royal Wedding in history of this decade is less than 48 hours away!  My oldest daughter, who is 11 is so intrigued by all the details surrounding the wedding.  She spent hours yesterday reading about the family tree and all about the Royal Family!  I love it!  


Luckily for us, we are on the East Coast and Live coverage begins at 4am, I wouldn't miss it! We have been watching Royal Family episodes this whole week.   Haley plans on waking at 5am to watch, as many of her friends to she said.  But then she does need to get off to school that day by 7:45am.   I thought it would be a cute idea to make her & the other girls at her lunch table Will & Kate Royal Wedding favors.  Haley will take them to hand out on Friday at lunch! (Yes, I am that Mom, but the girls will love it I'm sure!) I also jump at any chance to send in special treats for the girls or class!


With the help of Kim from The Tomkat Studio's Free printables & a box of TastyKake lemon krimpets it was simple!  Here is what you need:

Printables ~ Click here for The TomKat Studio to download your free printables
Box of Tastykake Krimpets or any short of cake package sweets
Ribbon
2 inch craft punch
Ribbon punch
Treat Bags


There you have it a sweet Will & Kate Royal Wedding Favor for my daughter & her friends!  


Peace, Love & Royal Wedding Favors,


Stacy

Tuesday, April 19, 2011

Easter Inspiration {Part 3}

I am sure you are getting everything together for Easter this weekend!  Last week I shared with you flowers & table setting & decor inspiration for Easter.  Today~ the scrumptious part!  Food!  There are many different types of food that are traditional to serve at Easter and actual symbolize different signs from with in the Christian beliefs.  I found this article to be interesting, if you wish take a click over and read some of the different meanings for the food.  

We wanted to put together something easy & inspirational for you to re-create or add to your Easter celebration and decor by putting these tables together for you!  

Using all your pretty cake stands to serve your treats to celebrate! 
Deviled eggs garnished with thyme, parsley & pansies
 in the back a red potatoes, green onion, mushroom egg frittata


Scrumptious banana cream pie garnished with pansies

Hot Cross Buns

Get extra use out of your glass dome from your cake plate. 
Adding character to your table by using it to cover another food.

Stack mini pancakes secure with a tooth pick pour syrup and place a strawberry on top.  
I was inspired to do this from a photo I saw on Pinterest. 

Everything Chocolate on Easter after a long 6 weeks of not having it!  
Mini Chocolate cupcakes top with fondant circles 
& party circles from Fresh Chick Studio


Add simple decorated eggs around the table

Fill a bowl with decorated sugar cookies & chocolate eggs for your guests


Pot pretty spring flowers!  Top them off with moss to cover the soil

Use pretty cloth napkins and align them down your table to create a table runner

There you have it!  I will be sharing 2 recipes this week for Easter!  
I sure hope you come back.  Don't forget about my first two posts of Easter Inspiration!  

I certainly enjoyed styling this inspiration shoot with Jane from The Garden Girls
 We hope you enjoy it! 

Peace, Love & Easter Celebrations,

Stacy

Wednesday, April 13, 2011

{Guest Post} DIY Easter Flower Arrangement Recipe

Happy Wednesday!  Have you seen the beautiful and refreshing spring flower arrangements in my last two Easter posts?  Today, Jane is here to tell us how to re-create it with step by step instructions with pictures so that we all can be creative with flowers!  I honestly every Friday head out to the store and/or my local farm to pick up fresh flowers and make pretty arrangements for my family to enjoy!  This tutorial will definitely help me in taking my arrangements to the next level.  


Let me introduce you to Jane from The Garden Girls~ I have known Jane all my life ;) she is my Aunt.  Creativity definitely runs in our family and I am happy that she can be here today!  Make sure you stop by their Facebook page and look at all the other things that she has created.  From artwork to floral arrangements you will be sure glad that you did!  Jane and her dear friend Janice are The Garden Girls and the arrangements they create are very impressive! 


Take it away Jane let us know how it is done!  


To me, Easter is the celebration of re-birth.  During this season the garden awakens from the cold days bringing vibrant tulips and the sunshine of the daffodils!   It is quite spectacular when planted in large clusters.

Arrangement #1 – Tulips and daffodils

In this arrangement after buying my flowers from our local shop, I gathered new blossoms from the Variegated Willow and Gold Splash Euonymus (the evergreen) that grow in our garden. It’s a lovely texture to add to any arrangement. Take a walk and see what you can find, Cherry Blossoms are also very pretty.  If you can not find these to re-create this arrangement, look for any flexible type branch for the Willow and some type of evergreen for the Gold Splash Euonymus

Here is the recipe for this arrangement: 

Flowers/materials used~

(The following you can get a Michael's or most any craft stores)

8” high oblong glass vase
Bindwire – by Oasis Floral Products
Reindeer Moss (bright green)
Glue Gun/3 sticks

5 Pink Tulips
5 Yellow/Pink blend tulip
5 Purple Tulips
5 Pink Stock
8 daffodils (medium flower)
2 Willow branches  - 18” long – single branch
2 Euonymus cuttings ( 8”)

  First clean off all of your stems.     
Start with the “Stock” and crisscross forming a “frog” type base.
I find it easier to use one with the four corners.
Then start with your tulips … I like working my way into the middle.
Always remember … like a cake, keep turning the vase so that there is interest on all 4-sides. 
Lastly, fill in with your evergreen. 

Forming the Willow interest in the middle.. take one branch and meet at the end and do the same with the other branch. Holding crisscross… wrap the wires crisscross to hold shape.

Attaching Moss and decorative ties….
Using the hot glue gun (work quickly, the glue will dry fast on glass. If you make a mistake it peels right off. (Important note: I would not recommend this on any good crystal vase or pottery, it may crack it.) Add your moss to the edge as shown.

The wire tie –
Triple up 24” pieces, twist and form shape and secure off. Twist away. This is a fun natural product that The Garden Girls love to use all the time.


There you have it! Please don’t be intimidated by flowers. Mother Nature is very forgiving when arranging, enjoy yourself and have fun creating!  

Happy Easter from The Garden Girls!

Thanks again Jane!  We hope you take a little time to create pretty Easter arrangements for yourself or to give as a hostess gift!  

We'd love to hear if you give it a try. Again feel free to head over to The Gardens Girls Facebook page, any questions let her know!  

Peace, Love & DIY Flower Arrangements,

Stacy

Tuesday, April 12, 2011

Easter Entertaining Decor Set-up Inspiration

Continuing on from yesterday! Here are more details & ideas for you when entertaining on Easter Day.  Whether it be a brunch, dinner or an open house you are having there is nothing more that makes me happier and I believe a lot of us then pretty Easter flowers & Easter decor to set the tone of the celebration!  The Garden Girls certainly add creative but easy touches to your flower arrangements to make them a bit unique and to your own style!  From a welcoming drink cart, to cookie boxes for your younger guests as they arrive and get ready for an egg hunt & my favorite a piece of a coconut chocolate egg!  Also notice the different ways to use the party dots that Fresh Chick Design Studio created! The religious inspired dots are in her shop! 
Photobucket


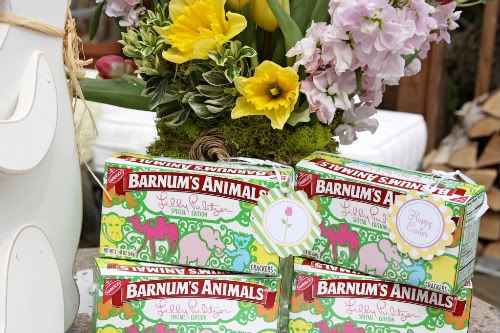
We all know Easter is about candy!  Offer a sweet treats like these adorable Lilly Pulitzer Animal Cracker boxes.  Attach a party dot to them to add your personal touch! 


One of my favorite treats on Easter is a dark chocolate coconut egg!  Add your personal touch by placing a dome or cloche bell jar over a decorative plate.

Party dots are not just for cupcakes!  
After you punch them out, use your hole punch to tie ribbon to the top to add them around your settings


Adding wooden & stuffed bunny decor 
adds a special festive touch!  

An inviting drink cart with a beautiful 
lilacs arrangement in a large glass container! Don't forget Jane from The Garden Girls will be guest posting here on how to create these arrangements! 

Use a glass pitcher to fill your favorite orange juice so 
that guest can make their own mimosas. 

Set out your pretty glasses! 

Sweet & simple bowl to add color & taste 
with strawberries & raspberries


Fill dainty containers with colorful tulips & roses

Pot pansies to add color

Find different containers to be creative 
with simple flowers & pretty bows

Sweet, easy decor to dress up your Easter Day!  I found my Lilly Pulitzer Animal Crackers at our local grocery store with is a Safeway brand store.  The wooden bunnies I have had for a few years, but you can find spring decor all over, I always like checking my local gift shops for things, they always seem to have unique little finds.   

Jane & I are hoping you are enjoy the Easter inspiration we are bringing you this week.  For tomorrow more sweets & food ideas for entertaining!  

Peace, Love & Easter Inspiration!  

Stacy